Personal Shader Work
Laser Dissolve Shader
The Shader

1. 'Hit Position' - The object space vector that is fed in from a C# script.
2. 'Offset' - An additive value that controls how much the effect is dialed in.
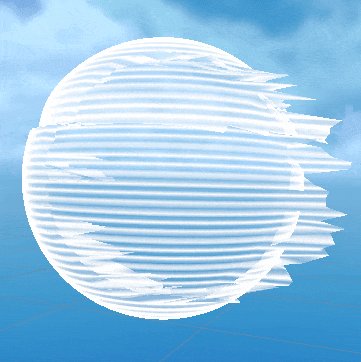
Below is a closer look at the core of the effect, which is the point calculation. Taking the distance of each vertex from a custom Input Vector gives a circular radius in 3D space, which I use to mask in the effect.


The Code
I've not included the Raycast code here as its quite standard, with the only exception being that when a successful hit is returned against a DissolvableObject, the Hit() method below gets called and passed the world space position of the hit point.


Above is the effect again, with a debug line for the raycast.
Just for fun, I included below a slightly more involved version of the code that adds in more juice, plus some movement that is controlled by the raycast. The full script and shader can be found in the link below.

For those interested, here are the assets packaged up:
(NOTE: the files are meant for review, not as a functional package that works out of box)
Mobile Refraction Glass Shader
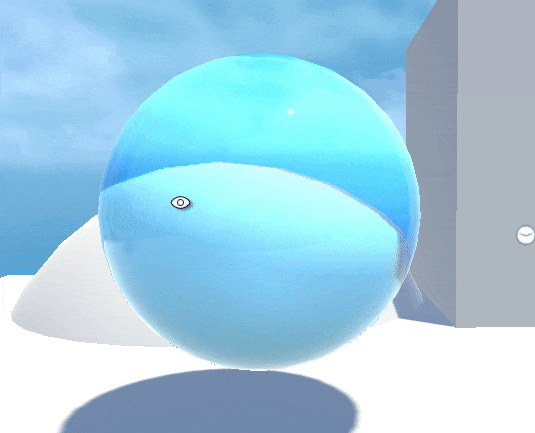
So this shader is mostly cannibalized from code found in Unity examples and such (the refract function used is straight up Unity's HLSL implementation), but it does run pretty well on mobile hardware.
I did a mobile VR benchmark test on the (now extremely low end) Oculus Quest 1- this shader was performing up to ~1.5ms on GPU in worst case camera angles, hitting the target 72 fps of the device. Meanwhile, an asset store alternative which looks similar in the exact same scene was highly variant in cost with up to ~12ms in worst cases, tanking perf down to ~40 fps.

As this one is a surface shader, it was pretty trivial to have a normal map input as well.

This solution isn't ideal for all scenarios, as it relies on a Unity grab pass to avoid unnecessary translucency cost. For those interested, here is the shader code available to download and peruse:
1) Make the exposed parameters straightforward and artist friendly
2) Modify vertex positions to animate the effect
3) Make the shader scalable with static toggles, so certain effects could be turned off and not compiled
Below are a couple of functions I used in this shader. The full shader code is available to download further down.

The 'PulseLine' function returns a single thin gradient line which is used later to slide down the length of the object.

The 'glitch' function returns essentially a parameterized pseudo-random number to offset vertices for the intermittent glitch that happens in the effect. This is encased in a compiler time 'if' check, and will be removed from the compiled code if a user unchecks 'Use Vertex Offset' (see below).
Here is a snapshot of the inspector for the material.
The 'Use Vertex Offset' Toggle controls whether the shader code pertaining to vertex animation will compile, in case it is undesired.
You can download the full shader code here:
